This article explains what the status light on your Roku® Smart Home device means during and after setup. It is important to understand what the status light means to determine whether there are any issues during the setup and operation of your smart home devices.
Status light for cameras
Roku Battery Camera (SCB11R/SCB12R)
The status light on your Roku Battery Camera (model SCB11R/SCB12R) is located on the front of the device, above the camera lens.
Refer to the table below for information about what the status light means as you power on your camera and continue with the setup process.
| Before setup | Status |
|---|---|
| GREEN - Solid | Ready to connect |
| YELLOW - Slow blinking | Powering up/Updating firmware |
| WHITE - Fast blinking | Connecting to network |
After you finish the setup process, learn what the status light means as you learn to use your camera.
| After setup | Status |
|---|---|
| RED - Blinking (3 times) | Error |
| GREEN - Solid | Fully charged |

Note: If the light on your Roku Battery Camera is solid yellow or off when connecting it to Wi-Fi, unplug your device and press and hold the Setup button until it starts blinking again. You may need to complete the setup process again.
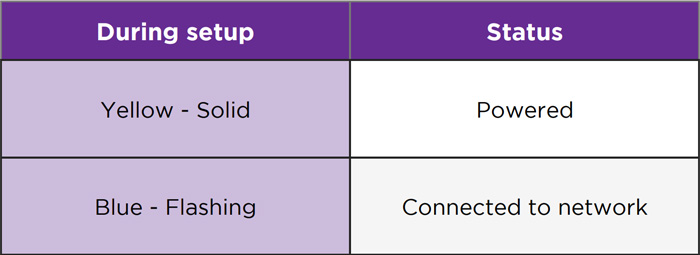
Roku Indoor Camera (model SCS11R/SCS11RW)
The status light on your Roku Indoor Camera (model SCS11R and SCW11) is located on the front of the device, above the camera lens.
Refer to the table below for information about what the status light means as you power on your camera and continue with the setup process.
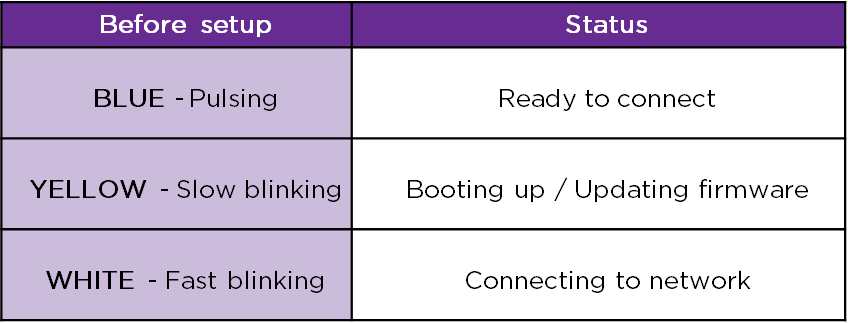
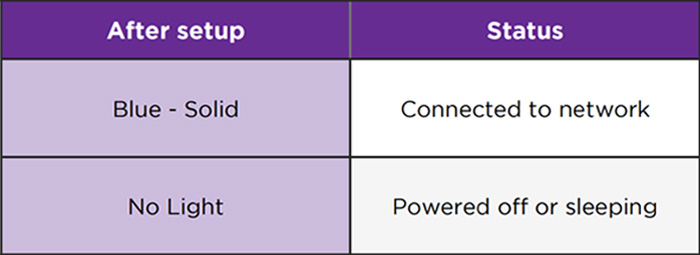
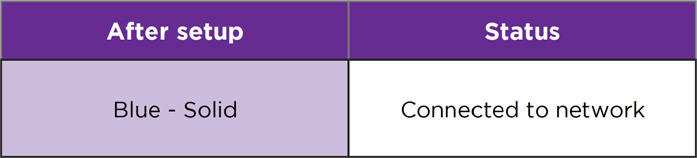
After you finish the setup process, learn what the status light means as you learn to use your camera.

Roku Outdoor Camera (model SCW11R/SCW11RW)
The status light on your Roku Indoor Camera (model SCW11R and SCW11RW) is located on the front of the device, above the camera lens.
Refer to the table below for information about what the status light means as you power on your camera and continue with the setup process.
After you finish the setup process, learn what the status light means as you learn to use your camera.
Roku Indoor Camera SE (model CS10005 and CS1000P25), Roku Indoor Camera 360° SE (model CP10005), Roku Outdoor Wired Camera SE (model CW10005 and CW100CR)
The status light on your Roku Indoor Camera SE, Roku Indoor Camera 360° SE, and Roku Outdoor Wired Camera SE is located on the front, above the camera lens.
Refer to the table below for information about what the status light means as you power on your camera and continue with the setup process.
After you finish the setup process, learn what the status light means as you learn to use your camera.
Roku Outdoor Camera SE
Camera
The status light on your Roku Outdoor Camera SE is located on the front, between the camera lens and light sensor.
Refer to the table below for information about what the status light means as you power on your outdoor camera and continue with the setup process.
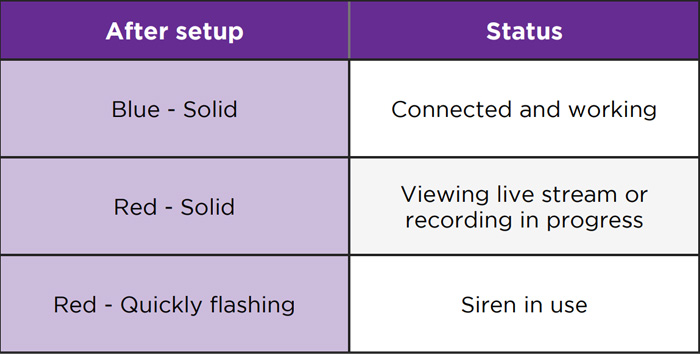
After you finish the setup process, learn what the status light means as you learn to use your outdoor camera.
Base station
The status light is located on top of the base station.
Refer to the table below for information about what the status light means on your outdoor camera base station.
Roku Floodlight Camera SE
The status light on your Roku Floodlight Camera SE is located on the front, above the camera lens.
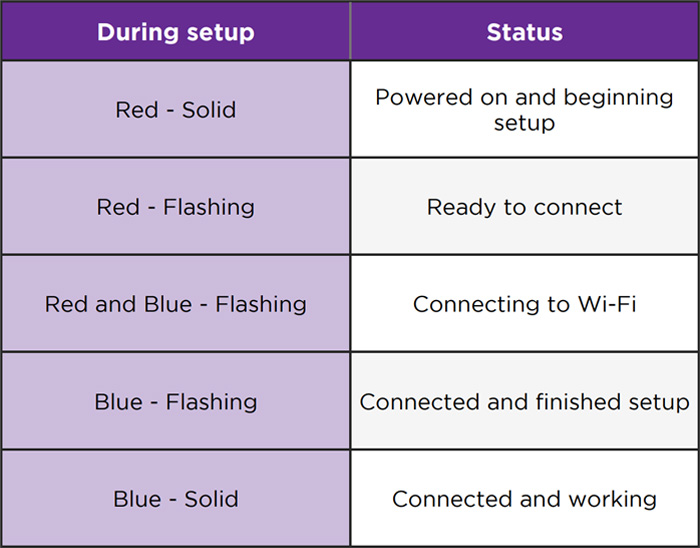
Refer to the table below for information about what the status light means as you power on your floodlight camera and continue with the setup process.
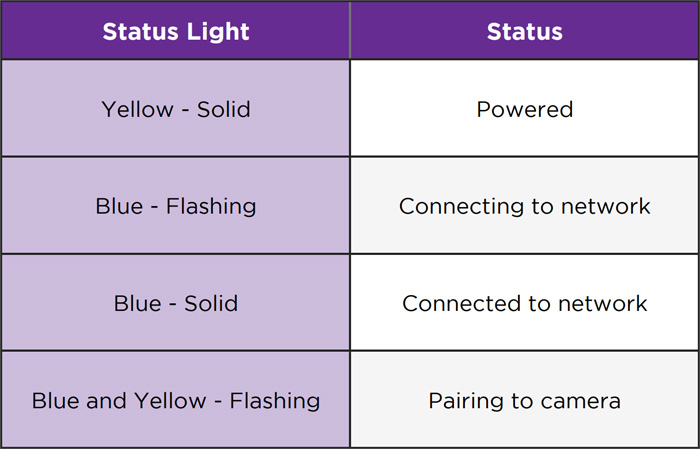
After you finish the setup process, learn what the status light means as you learn to use your floodlight camera.
Status light for home monitoring system
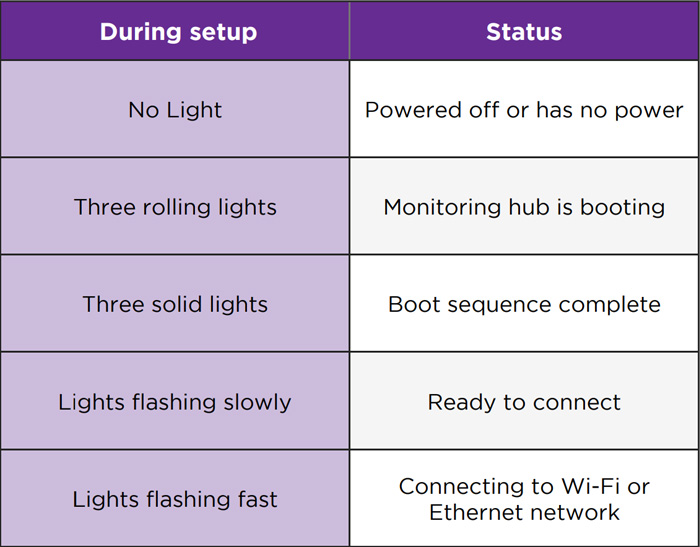
Roku Monitoring Hub
Your home monitoring hub has three status lights on the top.
Refer to the table below to learn what the different lights can tell you about your hub during set up.
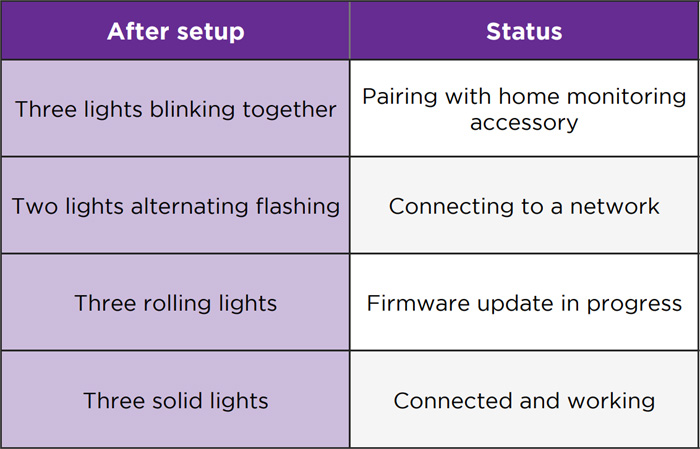
After you finish the setup process, learn what the status light means as you use your monitoring system.
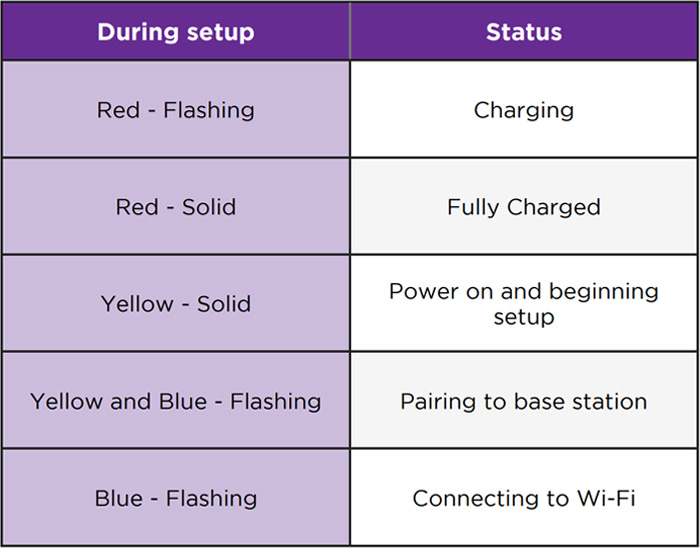
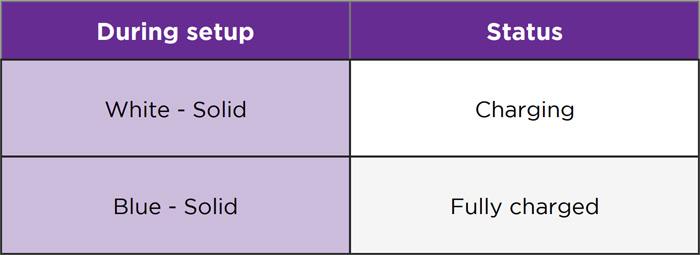
Roku Monitoring Sensors
Your entry and motion sensors have a red LED status light.
During setup, the light will blink once when the sensor is powered on and blink three times when the Reset button is pressed.
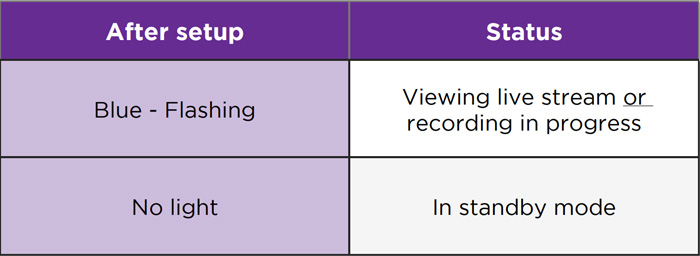
After setup, your entry sensor will blink every time it detects the opening or closing of a monitored door or window. Your motion sensor will not blink when it detects activity.
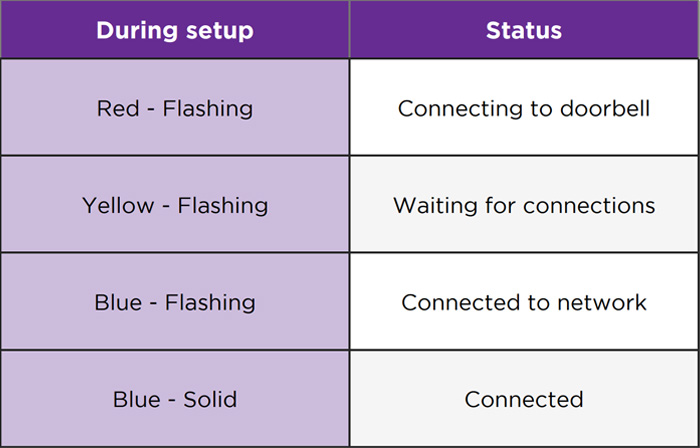
Status light for doorbell
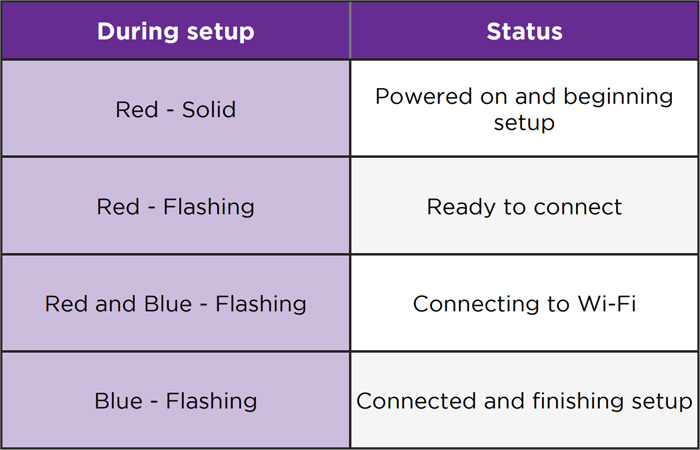
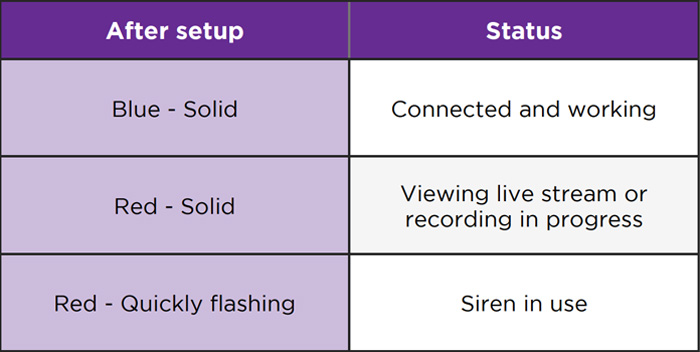
Roku Video Doorbell and Chime SE
Video doorbell
The status light on your Roku Video Doorbell SE is located on the front, above the camera lens.
Refer to the table below for information about what the status light means as you power on your video doorbell and continue with the setup process.
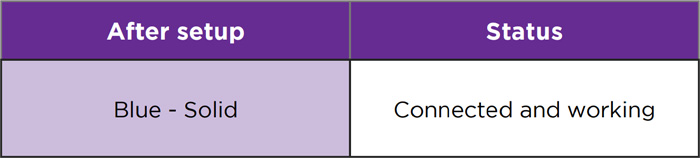
After you finish the setup process, learn what the status light means as you learn to use your video doorbell.
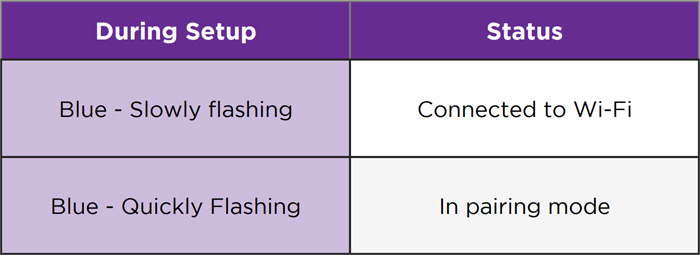
Chime
The status light on your Roku Chime SE is located on the top, below the setup button.
Refer to the table below for information about what the status light means as you power on your chime and continue with the setup process.
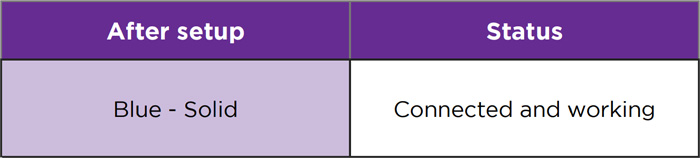
After you finish the setup process, learn what the status light means as you learn to use your chime.
Roku Wire-free Video Doorbell and Chime SE
Wire-free doorbell
The status light on your Roku Wire-free Video Doorbell is the LED ring surrounding the doorbell button.
Refer to the table below for information about what the status light means as you power on your wire-free video doorbell and continue with the setup process.
After you finish the setup process, learn what the status light means as you learn to use your wire-free video doorbell.
Chime
The status light on your Roku Chime SE is located on the front.
Refer to the table below for information about what the status light means as you power on your chime and continue with the setup process.
After you finish the setup process, learn what the status light means as you learn to use your wire-free video doorbell.
Status light for plugs
Roku Indoor Smart Plug SE
The status light on your Roku Smart Indoor Plug SE is located on the front, in the upper right corner.
Refer to the table below for information about what the status light means as you connect your indoor plug to power and continue with the setup process.

After you finish the setup process, learn what the status light means as you learn to use your indoor plug.
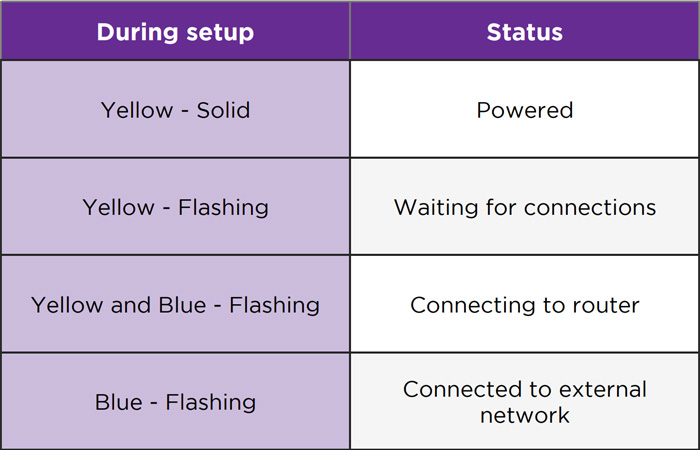
Roku Outdoor Smart Plug SE
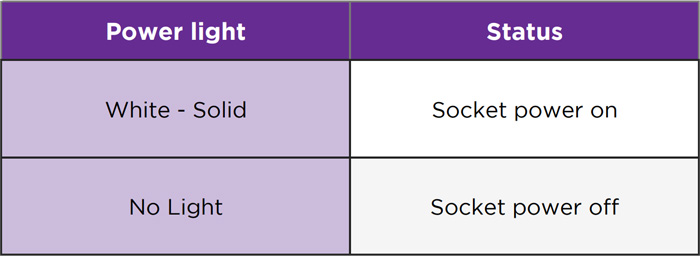
Your Roku Outdoor Smart Plug SE has a status light and a power light. The status light on your Roku Outdoor Plug SE is located on the top, between the two power buttons.
Refer to the table below for information about what the status light means as you connect your outdoor plug to power and continue with the setup process.
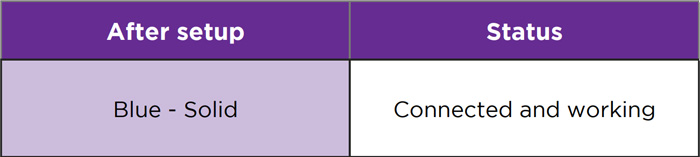
After you finish the setup process, learn what the status light means as you learn to use your outdoor plug.
The power light on your outdoor plug is located on the top, below the status light.
Status light for lights
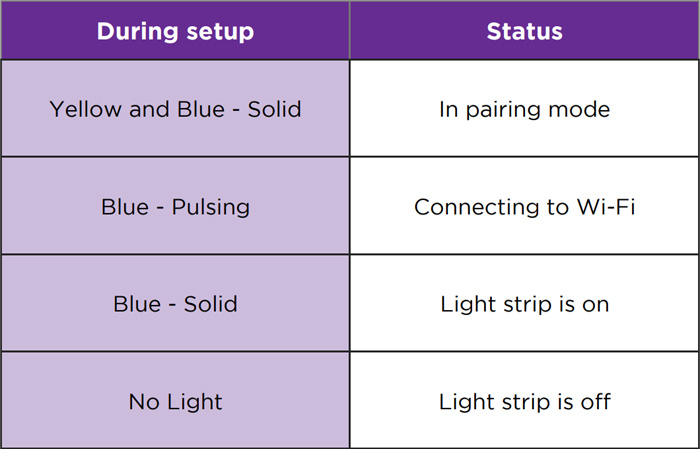
Roku Smart Light Strip SE and Smart Light Strip+ SE (16.4ft and 32.8ft)
The status light on your Roku Smart Light Strip SE is located on the front of the controller, in the upper right corner.
Refer to the table below for information about what the status light means as you connect your light strip to power and continue with the setup process.
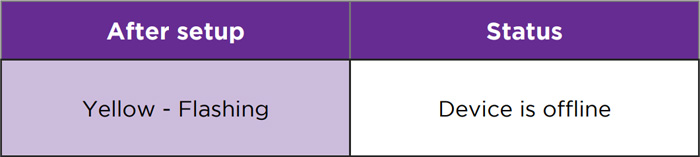
After you finish the setup process, learn what the status light means as you learn to use your smart light strip.
Last updated at 6/5/2026 7:56:23 PM
Was this article helpful?
Related articles
Need more help?
