A micro SD card provides physical storage for your Roku® Smart Home camera, letting you back up your event recordings and capture your continuous, scheduled, and time-lapse recordings. When you subscribe to Roku Smart Home, you can store and view these recordings on your computer. You will also be able to view events stored in the cloud from the Roku Smart Home mobile app.
This article provides more details about using a micro SD card with your smart home camera and teaches you how to back up and access your recordings.
What are the various types of recording?
There are four types of recordings you can store on a micro SD card installed in your Roku Smart Home camera.
Event recording
- What is it? Each time your smart home camera detects motion or sound, it captures a video clip and saves it as an event recording. You can adjust motion and sound settings to determine when an event recording is captured.
- Supported models: You can capture event recordings with all doorbell and camera models if you have a Roku Smart Home subscription.
- Storage: When you purchase a Roku Smart Home Subscription, an event recording is stored in the cloud for 14 days, but you can also choose to record it simultaneously to a micro SD card in case the internet connection is lost. Without a subscription, an event recording can only be backed up on a micro SD card.
- How to watch: An event recording stored in the cloud can be accessed from the Roku Smart Home app. To view an event recording backed up on a micro SD card, you must remove the card and connect it to your computer.
Continuous recording
- What is it? Continuous recording saves 1-minute video clips for as long as the camera is connected to power. When the storage is full, the oldest files are overwritten to make room for new video clips.
- Supported models: All Roku Smart Home cameras, except the Roku Outdoor Camera SE (model CW 1000), support continuous recording.
- Storage: Continuous recording can only be saved to a micro SD card.
- How to watch: To view a continuous recording, you must remove the micro SD card and connect it to your computer.
Scheduled recording
- What is it? A scheduled recording captures video only during a designated time on a daily, weekly, or one-time occurrence. Select the start time, end time, and occurrence, and your camera will record a video for the duration.
- Supported models: Only the Roku Outdoor Camera SE (model CW 1000) supports scheduled recording.
- Storage: A scheduled recording can only be stored on a micro SD card.
- How to watch: You can view a scheduled recording in the smart home app by opening your album. You can also remove the micro SD card and watch it on your computer.
Time-lapse recording
- What is it? A time lapse recording captures images at regular intervals to create a short video that shows an event happening gradually over hours or days. Simply select the start time, end time, and the interval.
- Supported models: A time-lapse recording can be captured on any Roku Smart Home camera.
- Storage: A time-lapse recording can only be saved to a micro SD card.
- How to watch: You can watch a time-lapse recording from your album in the smart home app, or you can remove the micro SD card and view it on your computer.
How to install a micro SD card
The micro SD card slot is typically located on the bottom of your smart home camera. To access it, you may need to adjust or remove the base or pull the camera away from an attached accessory. Identify your model and familiarize yourself with the location of the micro SD slot on your camera. The Roku Smart Home Camera models below support SD card recording.
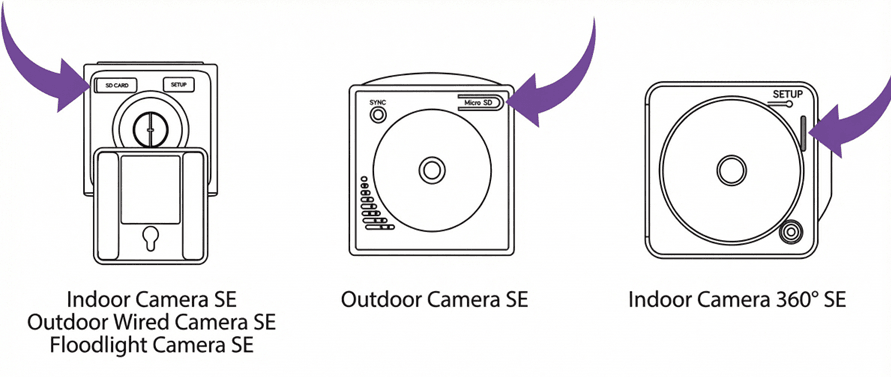
The supported cameras can use micro SD cards up to a 256GB except for the Outdoor Camera SE. This camera along with its base station are limited to cards ranging from 8GB to 32GB. When a micro SD card is installed in the base station, it is used to back up recordings from the outdoor camera.
After you locate the slot on your camera, use the steps below to install the micro SD card.
- Remove the protective cover if your camera has one.
- Slide the micro SD card into the slot with the metal contacts inserted first. A micro SD card only fits one way. Do not force it into the slot.
- Press the card firmly until you hear a "click". Pressing it again ejects it from the slot.
- Replace the protective cover if your camera has one.
How to format your micro SD card
Whether you are installing a new micro SD card or using an older one, it is recommended you format it to reduce the risk of data corruption. Keep in mind that formatting results in any existing data being deleted. Make sure to back up any files you want to save before formatting the micro SD card from the smart home mobile app or your PC or Mac.

WARNING: All data is erased during this process.
Format using the smart home app
- Select your camera from the Home screen
- Tap Settings
 in the corner
 - Select Advanced settings
- Tap Manage MicroSD card or MicroSD storage
- Tap Format
- Acknowledge that you understand that all data will be erased and tap Format again
In addition to formatting a microSD card using the smart home app, you can also format it using available Windows or MacOS tools on your computer. If your computer does not have a microSD slot, you will need to purchase a memory card adaptor to access the microSD card with your device. Consult the manufacturer's documentation and learn more about connecting a microSD card to your PC or Mac.
Format on your PC
- Slide the micro SD card into the proper slot on your PC or card adapter with the metal contacts facing the correct way. A micro SD card only fits one way. Do not force it into the slot.
- Press the card firmly until you hear a "click"
- Open Windows Explorer and locate the drive letter for your micro SD card
- Open the drive and save any files you do not want erased
- Right click the drive and select Format...
- Make a selection from the File system pull-down list based on the size of your micro SD card
- FAT32: 32GB or smaller
- exFAT: Larger than 32GB
Click Start and confirm all data will be erased
Remove the card and install it into your camera
Note: The Roku Outdoor Camera SE and its base station only support cards ranging in size from 8GB to 32GB with FAT32.
Format on your Mac
- Slide the micro SD card into the proper slot on your Mac or card adapter with the metal contacts facing the correct way. A micro SD card only fits one way. Do not force it into the slot.
- Press the card firmly until you hear a "click"
- Open the Card icon on your desktop and save any files you do not want erased
- Open the Disk Utility tool and select your card. If your card does not have a name, it will likely be labeled No Name or Untitled.
- Click Erase from the toolbar
- Select the Format based on the size of your micro SD card
- MS-DOS (FAT): 32GB or smaller
- exFAT: Larger than 32GB
Click Erase and confirm all data will be erased
Remove the card and install it into your camera
Note: The Roku Outdoor Camera SE and its base station only support cards ranging in size from 8GB to 32GB with FAT32.
How to save recordings to a micro SD card
To save video recordings captured by your smart home camera on a microSD card, open the smart home app and follow the instructions provided below.
Recordings will always be saved to a microSD card using Full HD 1080p resolution. When your card runs out of space, the oldest footage is overwritten to make room for new recordings.
Event and continuous recordings
- Select your camera from the Home screen
- Tap Settings in the corner
- Select Advanced settings
- Tap and toggle Record to MicroSD card
- Select Continuous or Events only
Scheduled and time-lapse recording
- Select your camera from the Home screen
- Tap More

- Select Scheduled recording or Time-lapse
- Enter the details for the recording
How to remove your micro SD card
To safely remove your micro SD card from your camera and avoid the risk of data corruption, follow these steps in the smart home app:
- Select your camera from the Home screen
- Tap Settings in the corner
- Select Advanced settings
- Tap Manage MicroSD card or MicroSD storage
- Tap Eject MicroSD card
- Push your micro SD card to release and eject it
Last updated at 6/25/2026 11:16:01 PM
Was this article helpful?
Related articles
Need more help?
