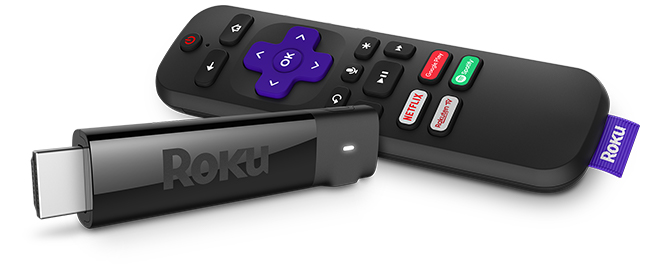
Note: The power connector is located on the side of the Roku Streaming Stick+ (see below). If the power connector is located on the end of your device, you have a Roku Streaming Stick. You can refer to the general Roku player and Streaming Stick instructions for setup.
Will the Roku Streaming Stick+ work with my TV?
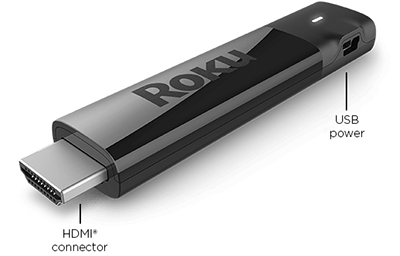
Your Roku Streaming Stick+ will work with any television with an HDMI® connection and connects directly to the TV's HDMI port.
However, you will not be able to take advantage of 4K resolution without a 4K-compatible TV, or HDR without an HDR-compatible TV. A compatible television is not the only requirement to stream movies and TV shows in 4K or HDR; learn more about setting up your Roku player for 4K Ultra HD or setting up your Roku player for HDR.
If your Roku Streaming Stick+ will not fit in your TV's HDMI port, then you may wish to get a free HDMI extender cable.What is the advanced wireless receiver?
The advanced wireless receiver is part of the USB power cable that must be attached to your Roku Streaming Stick+. It allows your Roku Streaming Stick+ to connect to your wireless network and the internet so you can stream movies, TV shows and more.
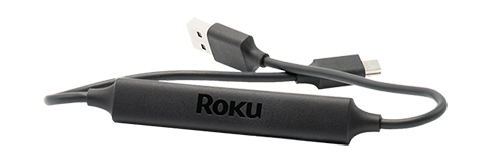
The advanced wireless receiver is designed to reduce wireless interference providing a faster and more reliable connection. Power is provided to your Streaming Stick+ by connecting the advanced wireless receiver to the USB port on your TV, or preferably, a wall outlet (when used with the included USB power extender cable and power adapter).
How do I connect my Roku Streaming Stick+?
Use the diagrams below as a guide to help connect your Roku Streaming Stick+. Make sure all connections are secure and firmly attached.
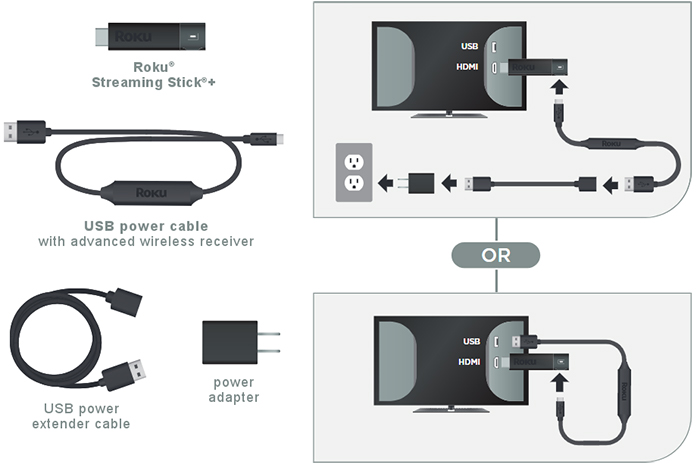
To get started, connect your Roku Streaming Stick+ to an available HDMI port on your TV. If you plan to stream movies and TV shows in 4K or HDR, remember to select an HDMI 2.0 port that supports HDCP 2.2. Learn what to look for when trying to identify an HDMI input that supports HDCP 2.2.
If your Roku Streaming Stick+ will not easily connect to the HDMI port on your TV due to space restrictions, then you may wish to get a free HDMI extender cable.Next, plug the USB power cable with advanced wireless receiver into a suitable power source – either the USB port on your TV, or preferably, a wall outlet (when used with the USB power extender cable and power adapter).
Note: The USB port on some TV’s may be unable to power a Streaming Stick+. If you see the on-screen warning message that appears in these cases, use a wall outlet.
Finally, attach the advanced wireless receiver firmly to the Roku Streaming Stick+. A poor connection will prevent your Streaming Stick+ from connecting to your wireless network and ultimately the internet.
Note: If you recently moved your Roku Streaming Stick+ from another HDMI input, or another TV altogether, make sure to check that all connections are secure before use.
Setting up your Roku Streaming Stick+
- Review the Quick Start Guide below, or follow along with the tutorial video:
Roku Streaming Stick+ Quick Start Guide (model 3810) - Use your TV remote to power on your television and select the input where you connected your Roku Streaming Stick+. You should see the Roku logo on the TV screen as your player powers on. Help is available if you do not see any picture on your TV.
- Slide open the battery cover on the back side of your remote and insert batteries. Help is available if you have problems with your remote control.
On-screen setup and activation
- Choose a language
- The first screen you see will allow you to choose a language. All text and dialog within the Roku interface will be displayed in the selected language.
- Scroll up and down the list and press the OK button
 on your Roku remote to choose a language.
- Note: It is the responsibility of the channel publisher to translate their channel and some channels may not support your chosen language.
Connect your Roku Streaming Stick+ to your network and the internet
- Choose your wireless network from the list of available networks and enter your password. This is most often the same network you use to connect your computer or smartphone to the internet. If you do not see your network, select Scan again to see all networks. For more assistance, see help finding your wireless network and password.
- If you want to see your password as you type, choose Show password. This can help prevent entering the wrong password. Remember, passwords are case-sensitive. Use the shift button
 on the on-screen keyboard to enter a capital letter.
 - Once you enter your password and select Connect, your Roku Streaming Stick+ will automatically connect to the internet. Alternatively, you can get more help if you are unable to connect to your wireless network.
Wait for your Roku Streaming Stick+ to download the latest software
- Once connected to the internet, your Roku Streaming Stick+ will download the latest version of Roku OS software and then reboot.
Set the display type
- Select Auto detect displaytype and your Streaming Stick+ will analyze the HDMI connection to determine the supported video resolutions. To have your Streaming Stick+ automatically choose the best display resolution so you don’t have to manually configure the settings, choose OK, go to automatic. To change the display type at a later time, go to Settings > Display type.
- If support for 4K or HDR is not detected and you are using a 4K-compatible TV or HDR-compatible TV, make sure all HDMI cables are firmly attached and all connections support HDCP 2.2. For more help, review the steps for 4K setup or HDR setup.
Set up your Roku enhanced remote to control your TV
- Select Check remote settings to automatically set up your Roku enhanced remote to control the power and volume for your TV. If you prefer, you can set up your remote at any time from the settings menu. Go to Settings > Remotes & devices > Remote > Set up remote for TV control.
- Note: The Roku enhanced remote may not be able to control volume and power on all TV models. With some TV models, you may only be able to control the volume, and not the power.
- Select Check remote settings to automatically set up your Roku enhanced remote to control the power and volume for your TV. If you prefer, you can set up your remote at any time from the settings menu. Go to Settings > Remotes & devices > Remote > Set up remote for TV control.
Create a Roku account and activate your Roku device
- To activate your Roku device, it must be linked to a Roku account. Your Roku account stores information on which devices you own, and which channels you have installed, as well as your preferences and settings.
- Note: There is NEVER a charge to create a Roku account.
- When prompted on screen, enter a valid email address to use for your Roku account, and then switch to your computer or smartphone to activate and link your Roku device. Be aware that it may take a few moments to receive the activation email from Roku. If you do not see it in your email inbox, be sure to check your spam (or junk) folder. If you cannot get your Roku device activated, learn how to resolve linking issues.
- Note: Roku does not require an activation fee, or charge for support of any kind. Learn how to avoid fraudulent websites.
- To activate your Roku device, it must be linked to a Roku account. Your Roku account stores information on which devices you own, and which channels you have installed, as well as your preferences and settings.
You are done!
- With all steps complete, your Roku Streaming Stick+ is ready to use.
Tip: You can personalize your Roku Streaming Stick+ by changing your theme pack or screensaver. You can use the Roku Channel Store to add new streaming channels, games, and other apps.
Why is the image not in HDR or the picture quality poor when watching HDR content?
When you specifically watch an HDR movie or TV show on your HDR-capable Roku device, you may notice the image is not displayed in HDR, or the picture quality is poor. If you encounter this behavior, you may need to update the software on your HDR-capable TV. You can typically find instructions how to do this along with the latest software on the TV manufacturer’s website. Once you confirm that your TV is running the latest software, check that it is properly configured to enable HDR on the specific input to which your Roku player is connected. Some TVs that support HDR do not enable this feature by default.
Last updated at 3/17/2026 9:58:06 AM
Was this article helpful?
Related articles
Need more help?
