Your Roku TV Ready soundbar has been designed to work seamlessly with your Roku TV™ assuring simple setup, easy access to sound settings, and compatibility with your Roku TV remote. Connect your soundbar to the HDMI® ARC port on your Roku TV, complete the easy setup process, and begin enjoying an upgraded audio experience in no time. This article helps you determine if your soundbar is Roku TV Ready certified and outlines the setup process in more detail.
How to tell if your soundbar is certified
To determine if your soundbar is Roku TV Ready certified, look for the certification logo (seen below) on the original packaging or user manual, or visit the product details page on the manufacturer's website.
![]()
How to find the HDMI ARC port on your Roku TV
For your Roku TV Ready soundbar to work seamlessly with your Roku TV, you must connect it to the HDMI ARC port, or HDMI eARC port as it is labeled on some Roku TV models. HDMI ARC lets your Roku TV send audio from streaming channels, the built-in TV tuner, and connected devices like a Blu-ray™ player, game console, or cable/satellite set-top box without the need for additional cables. HDMI eARC works the same, but also offers support for advanced surround sound formats with higher audio quality and has built-in audio and video "lip-sync". If you want to learn more about the differences, refer to the detailed article about ARC and eARC on your Roku TV.
Use the guidelines below to help identify the HDMI ARC (or HDMI eARC) port on your Roku TV.
HDMI ARC
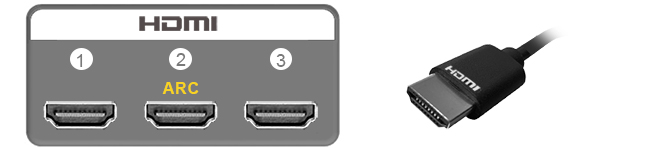
The HDMI ARC (or Audio Return Channel) connection is located among the other HDMI ports and is often labeled "HDMI ARC" or just "ARC". When connecting your soundbar, you will use an HDMI cable.
HDMI eARC (select Roku TV models only)
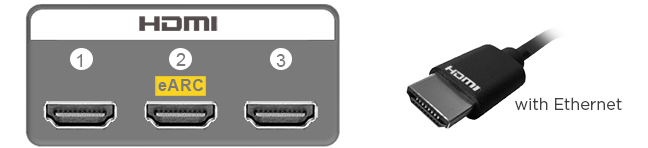
The HDMI eARC (or Enhanced Audio Return Channel) connection is located with the other HDMI ports and is commonly labeled "HDMI eARC" or simply "eARC". To take full advantage of the benefits of eARC, your Roku TV Ready Soundbar must support eARC and you need to connect it using a High Speed HDMI Cable with support for Ethernet.
- Note: A soundbar that supports eARC can be connected to an ARC port for standard ARC functionality. Similarly, a soundbar that only supports ARC can be connected to an eARC port for the same standard ARC functionality.
If another device is already using the HDMI ARC (or HDMI eARC) port, consider moving that device to a different HDMI port before you connect your Roku TV Ready soundbar.
How to begin the setup process
Connect a single HDMI cable from your soundbar to the HDMI ARC (or HDMI eARC) port on your Roku TV, and make sure both devices are powered on. When your Roku TV detects the soundbar, it will automatically initiate the setup process. Follow the simple on-screen instructions to finish setting up the connection.
Why do I see a message that my soundbar is plugged into the wrong port?
It is important to understand that not all HDMI ports are created equal. Only the HDMI ARC (or HDMI eARC) port allows your soundbar and Roku TV to properly communicate back and forth with each other over the HDMI cable. Double-check the connection and make sure your soundbar is connected to the HDMI port specifically labeled "HDMI ARC" or "ARC" (or "HDMI eARC" or "eARC").
- Note: The sample diagrams above are not intended to be an exact depiction of the connections on your Roku TV. Refer to the user manual that came with your Roku TV or contact the manufacturer directly if you need help identifying the correct HDMI port.
How to set up your Roku TV Ready soundbar with a wireless subwoofer
Manufacturers of Roku TV Ready soundbars often include a wireless subwoofer as part of a package. If your purchase included a wireless subwoofer, it connects to the soundbar and not your Roku TV. Refer to the user manual that was included from the manufacturer or visit their website to learn how to set up and troubleshoot the wireless subwoofer connection.
Last updated at 3/3/2026 1:42:01 AM
Was this article helpful?
Related articles
Need more help?
